Implementing Cerbos in a Spring Boot Application
In this tutorial, you’ll learn about authorization, how it works, and how to use Cerbos to integrate authorization into a Spring Boot application. Let's get started.
What is Authorization and Access Control?
Authorization defines the number of functions the user can perform or the information the user can access. For instance, consider a blogging application where a user attempts to edit a blog. The authorization mechanism checks if the user owns that particular blog post. If the user is not the owner, access to the blog is denied, ensuring that users can only edit their blog posts.
Just like authentication, authorization is also a step in Access control. You can think of access control as a superset, while authorization is one of its subsets.
Access control can be broken down into three main components:
- Authentication (AuthN): Verifying the identity of users, ensuring they are who they claim to be before granting access to resources.
- Authorization (AuthZ): Controlling what actions users are allowed to perform and what resources they can access based on their authenticated identity.
- Logging: Recording events and activities related to authentication and authorization processes for security monitoring, auditing, and analysis purposes.
Policies we want to define: Overview of our goal
Admin Rights (Create, Read, Update, Delete access for all blogs) → User 2 and User 5
Read-Only Access → All Users
Derived Role: Owner (Read, Update, Delete access for their own blog): If blog.Id == user.Id ⇒ That user is the owner of their blog:-
- User 1 ⇒ Blog 1
- User 2 ⇒ Blog 2
- User 3 ⇒ Blog 3
- User 4 ⇒ Blog 4
- User 5 ⇒ Blog 5
We have authorized them to take action on their own blog.
Integrating Cerbos in a Spring Boot Application
In our blogging application, we have 5 users, and we want to give admin permission to user2 and user5, giving them the authority to update and delete all the blogs irrespective of the author. As of now, the way our blogging applications work is that nobody can edit or delete anyone else's posts. We need some policy or authorization mechanism. Typically, below is how our permission should look like:
- Admins should have full access to all operations (Role-Based Access Control).
- Users can view all blogs and manage (edit/delete) only their posts(Attribute-Based Access Control).
- Read-only access is given to all the users.
Breakdown of Privileges
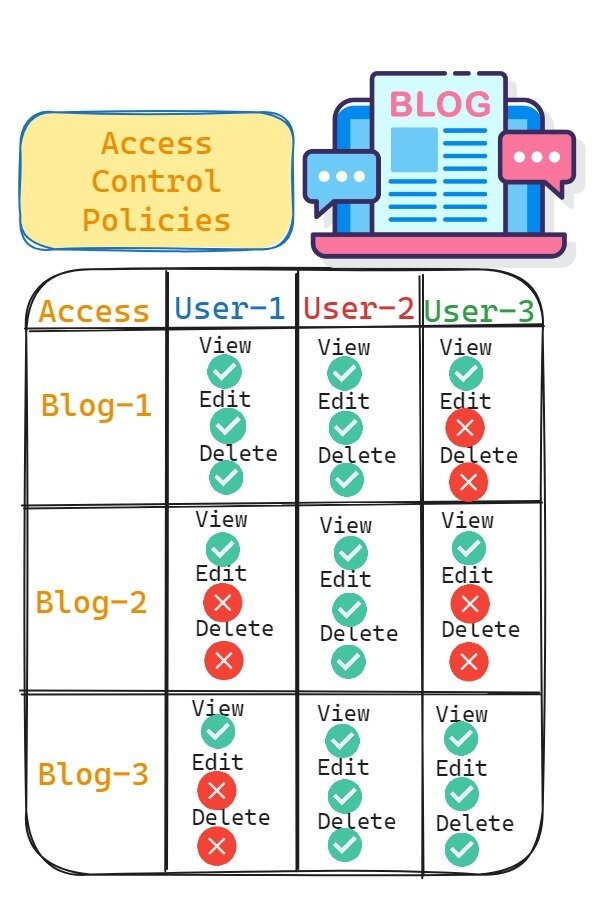
Types of Policies
Resource Policies
Resource policies govern the actions that are permitted or forbidden on application entities known as resources. In a project management tool, this could mean defining who can edit a particular task or who can view the entire project plan.
Derived Roles
When an identity provider also provides user roles, a derived role can be created to incorporate context-specific information for more granular access control. For instance, a general "team_lead" role could be specialized to "team_lead_finance" when the departmental context is considered, granting specific access relevant to the finance department’s documents.
Policy Creation with Cerbos
Cerbos Hub
Cerbos Hub is a centralized repository or platform designed to streamline the management and sharing of Cerbos policies. It acts as a collaborative space where developers can access a variety of pre-built policy templates, share their own custom policies, and utilize best practices for access control configurations. Cerbos Hub manages the validation, testing, compilation, and deployment of policy updates across all connected Cerbos policy decision points. As part of the continuous integration process, Cerbos Hub also generates an embedded PDP (powered by WebAssembly) which can be loaded into edge functions or onto client applications where it isn’t possible to run a full service. As these are generated by the same pipeline that distributed policies to the server-side instances, policies are always up to date and in sync.
Cerbos Policy Decision Point (PDP)
Cerbos PDP, or Policy Decision Point, is the core open-source component of the Cerbos system that evaluates incoming access requests against defined policies to make authorization decisions. When an application queries the PDP with details about a user's action on a resource, the PDP assesses this request in the context of the applicable policies and returns a decision—allow or deny—based on the rules specified. The PDP ensures that access control logic is centralized, decoupling it from application code to enhance security, maintainability, and scalability.
Prerequisites for integrating Cerbos with a Spring Boot app
We suggest you install these dependencies beforehand so that you can follow the tutorial with ease.
- WSL (If Windows is your primary OS)
- Docker
- JDK minimum requirement: 17
Getting started
- We have built a basic blogging application. To get started, clone this repository and follow along. We should be in the backend directory, which, in our case, is java-cerbos/backend.
- Following that, run ./gradlew bootrun. This command will bootstrap our application.
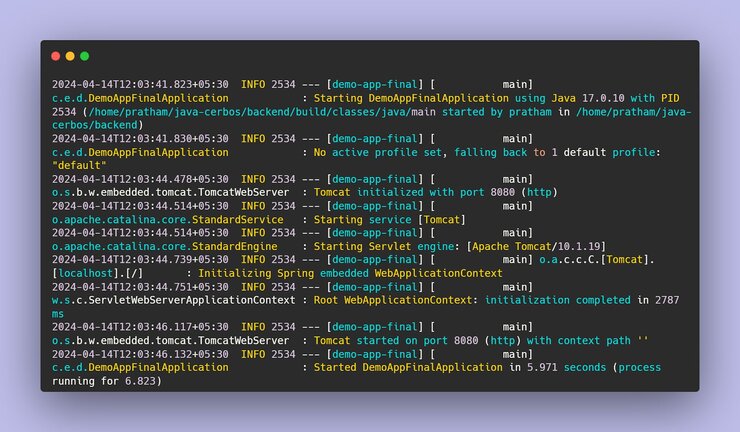
If the build is successful, we will see the web-app UI, loading on localhost:8080.
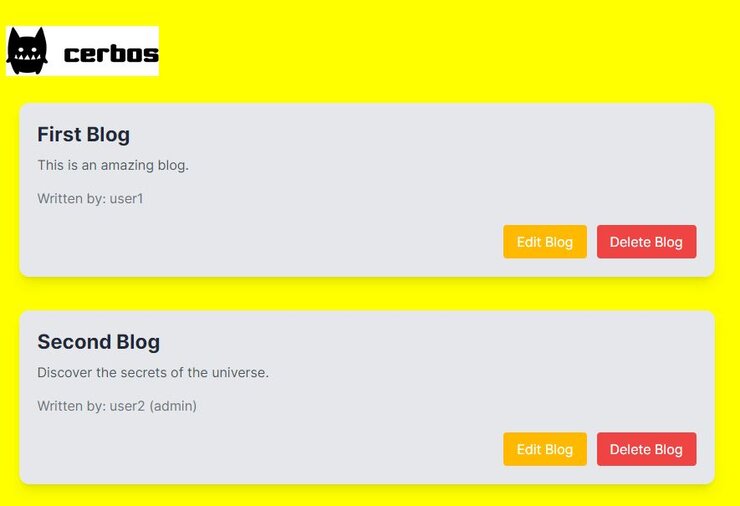
Testing the Application without Authorization
Since we have not set up any authorization mechanism or policies, no action will be allowed. Be it, user or admin, any action will return ‘Unauthorized’. To grant the desired permission level, we need to implement policies using Cerbos.
Generate Policy Files Effortlessly with Cerbos RBAC Policy Generator
Now, we need to define policies governing access control according to the application's needs.
Write your RBAC (Role-Based Access Control) policy with a few clicks using the Cerbos RBAC Policy Generator — it's easy to use, developer-friendly, and hassle-free to generate policies.
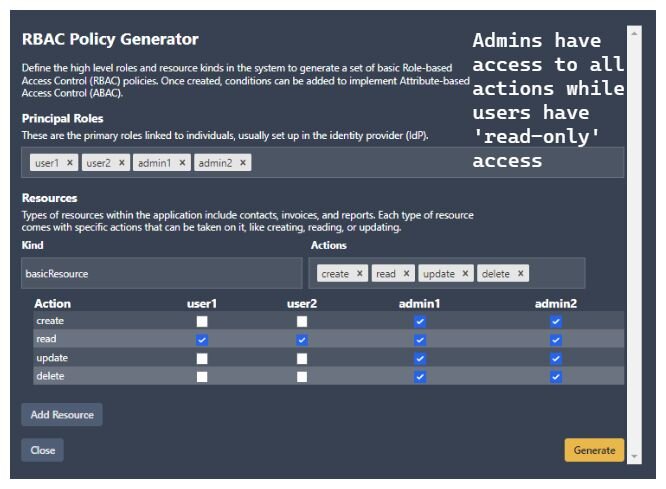
You can select checkboxes according to your logic, and then click the Generate button to generate a YAML policy file named basicResource.yaml.
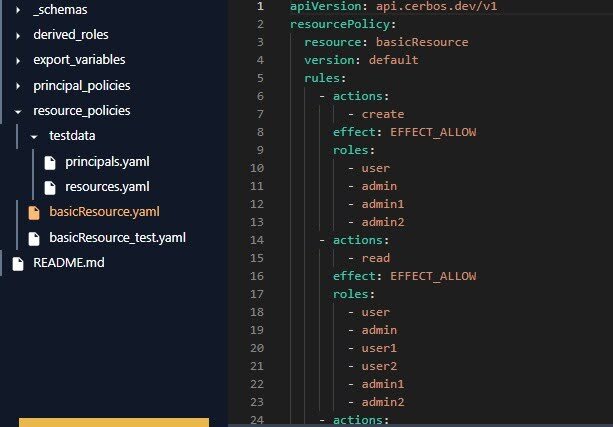
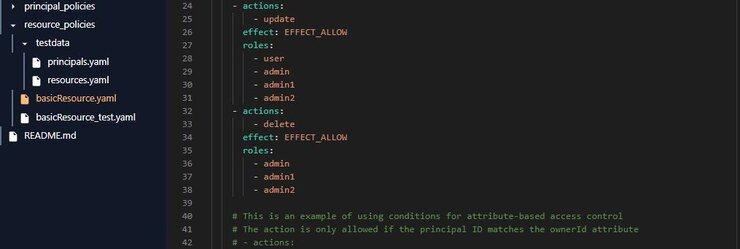
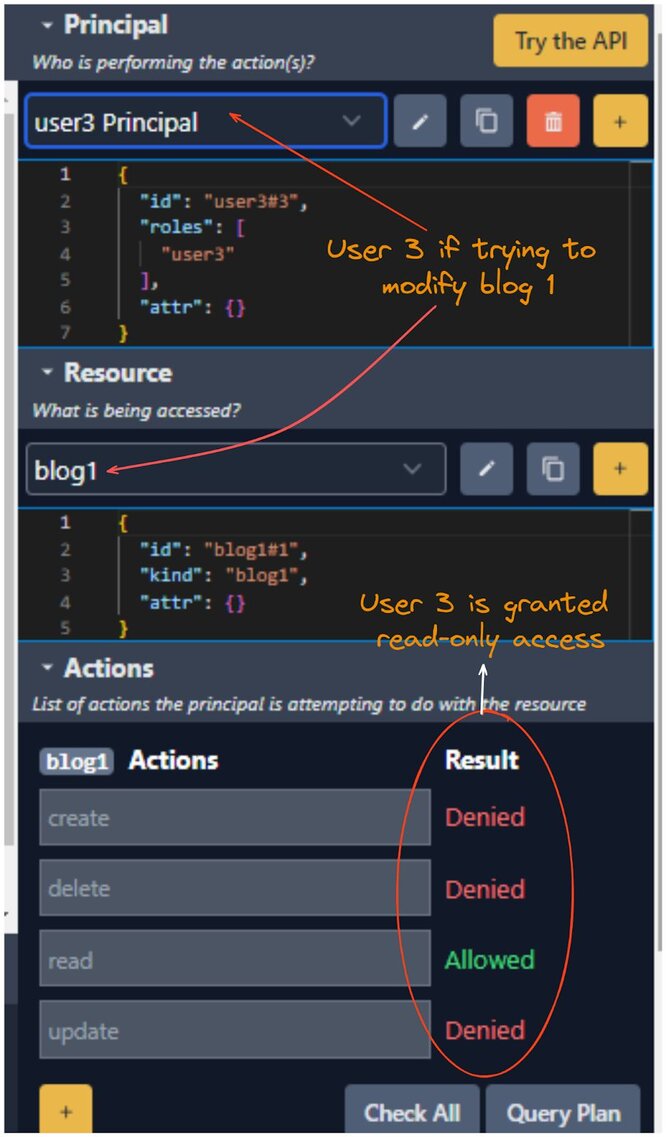
With the RBAC policy generator, in addition to generating the policy file, there is also an interface where you can select the principal and resource to check permissions based on the policy file.
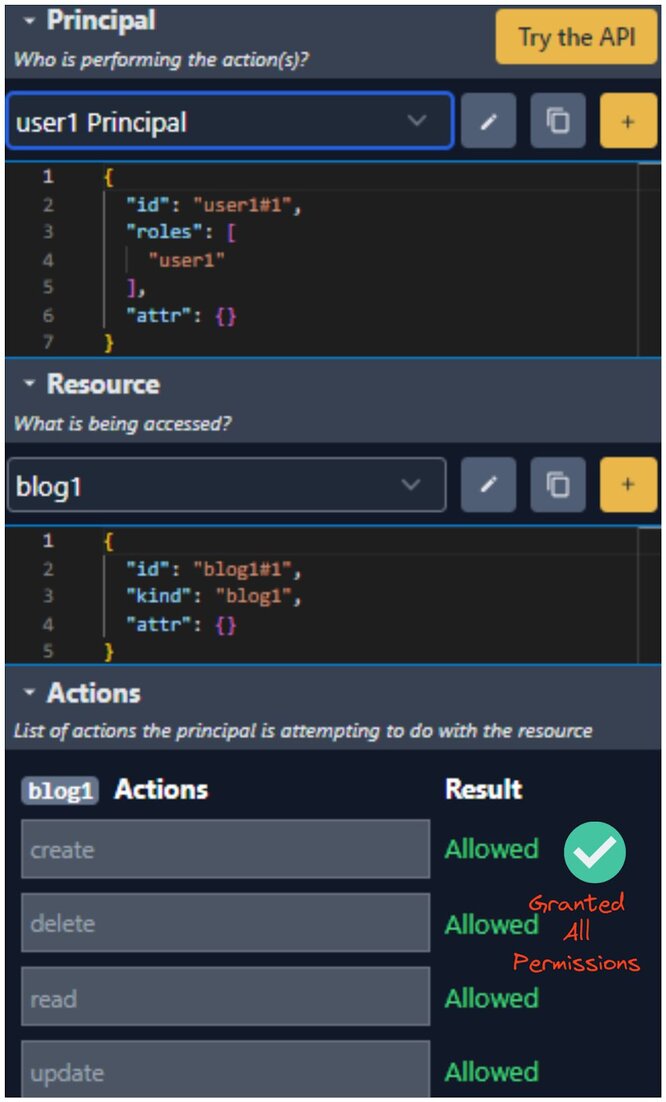
- Principal: Who is performing the action - In our case, it could be user1, user3, etc.
- Resource: What is being accessed - In our case, it could be blog1, blog2, etc.
Should the user be User 1, the owner, or either User 2 or 4 with administrative privileges, access to all actions would be rightfully authorized, allowing complete control within the platform.
Cerbos RBAC policy generator takes care of the syntax, while you can focus solely on the logical aspect of the policies.
The RBAC Policy Generator can be used to create drafts and production-ready policies as long as the logic incorporates the needs of your application. However, we have created custom policies for our blog application.
In our blogging application, we use two policy files: (blog_post_roles.yaml) determines the derived roles, and (blog_policy.yaml) defines the access control based on these roles. Segregating policy fields into two different files ensures that we follow best practices for defining policies. To read more about best practices to define policies, you can visit our documentation where we’ve discussed it in great detail.
The policies directory under cerbos(path: /java-cerbos/cerbos/policies) has YAML files that take care of the policy configurations:-
blog_post_roles.yaml
This grants users a derived role of "owner" if their ID matches the owner attribute of a blog post, thereby simplifying the declaration of complex access control logic.
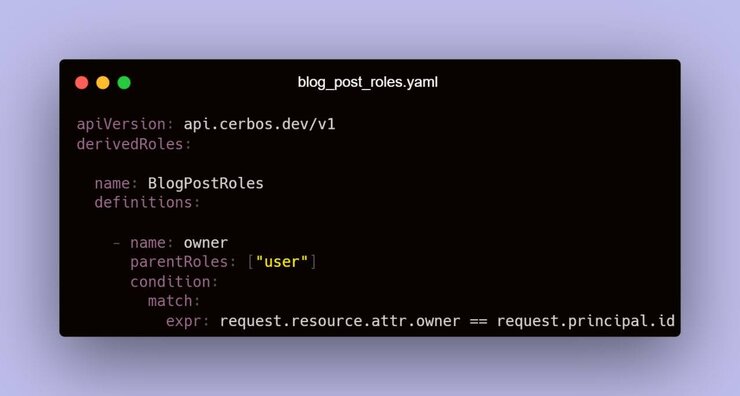
blog_policy.yaml(filepath: cerbos/policies/blog_policy.yaml)
This policy document outlines access rules for a "blog" resource. It grants reading privileges to a role admin and a derived role owner, ensuring broad visibility. Admins are given full capabilities to modify or delete any blog post, signifying complete content oversight. For users, update and delete permissions are conditioned on ownership—users can only alter posts they own, preventing unauthorized modifications to others' content.
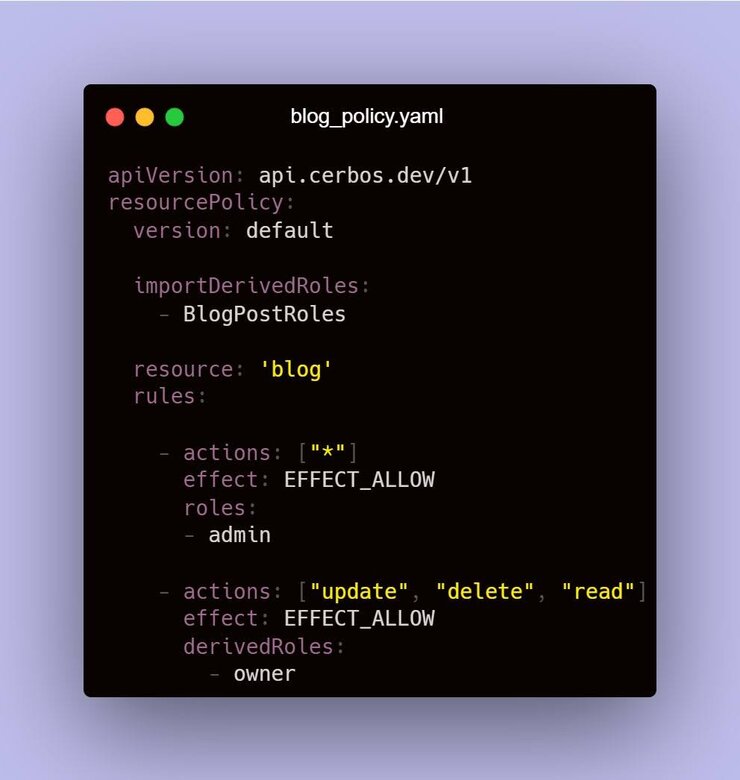
This policy configures access control for actions on the blog resource. It allows the admins to perform any action on the blog. For actions like "update," "delete," and "read," it checks if the user has a derived role of "owner," and if so, allows these actions.
Integrating Cerbos as a service
To integrate Cerbos, we will begin by launching the Cerbos Docker container. In the root directory, use the following command to run the Docker container:
docker run --rm --name cerbos -d -v $(pwd)/cerbos/policies:/policies -p 3592:3592 -p 3593:3593 ghcr.io/cerbos/cerbos:0.34.0- Run
docker psto check if the container persists. - Stop the backend and frontend if running already and restart the backend using the
./gradlew bootruncommand and frontend withnpm startcommand.
Open the project using your preferred IDE and make modifications.
Using the Cerbos Java SDK to Connect with the Application
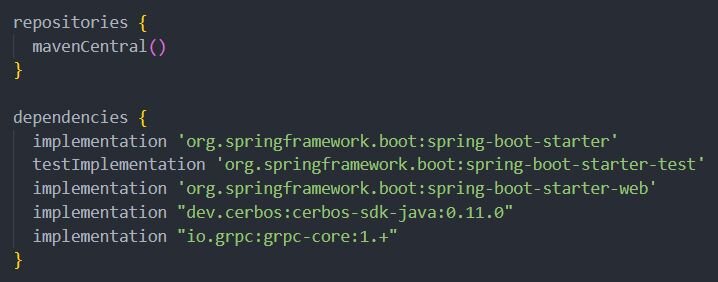
The following code in a build.gradle file adds the required dependencies for Java SDK.
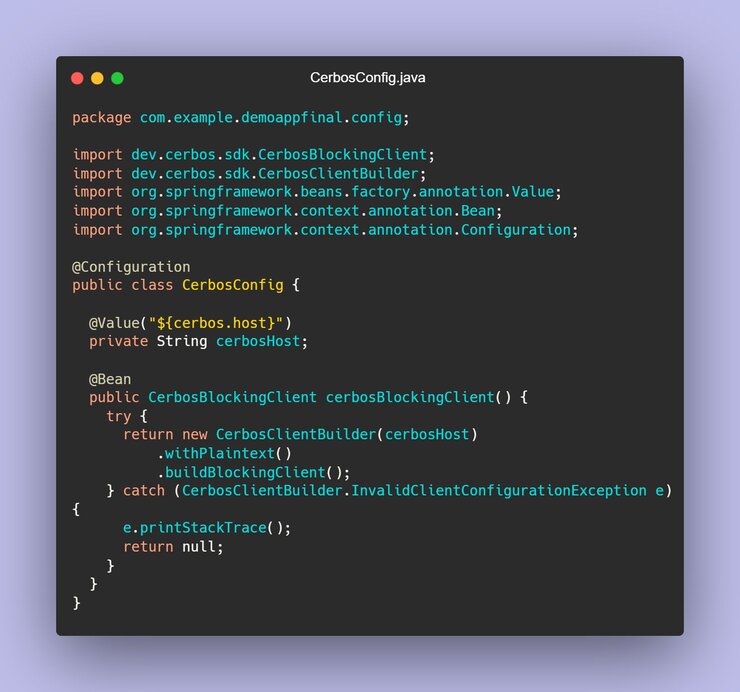
The following code defines a Spring configuration class to generate a bean for CerbosBlockingClient using the Cerbos host (localhost:3593) supplied in the application's settings. It establishes an unencrypted connection to the Cerbos server and prints the stack trace to handle configuration issues.
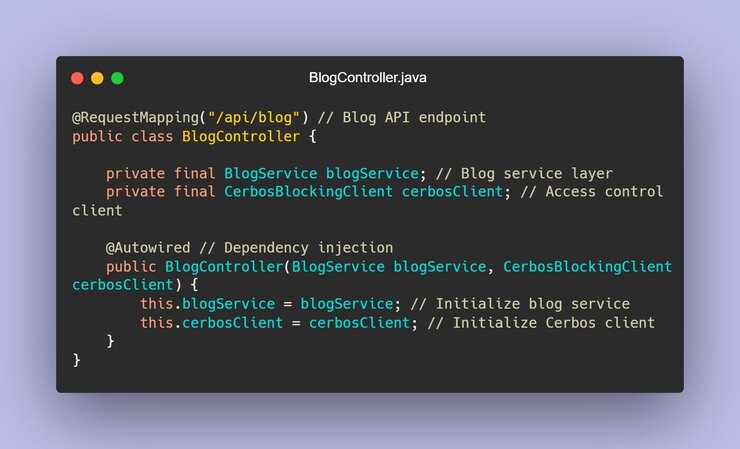
The BlogController class(present in backend/src/main/java/com/example/demoappfinal/controller/BlogController.java) handles web requests to the /api/blog endpoint.
It is equipped with a BlogService for business logic and a CerbosBlockingClient for authorization checks, both injected via its constructor using Spring's @Autowired annotation.

In all our methods (GET, PATCH, DELETE) we define the principal and resource:
Principal: A principal is assigned a role, which can be either 'user' or 'admin'. It also has an attribute with the key 'id' and the value 'userName', which could be user1, user2, user3, etc., depending on the requesting user. In a production application, this identity would come from your IdP.
Resource: A resource is identified by the 'blogId' and has an attribute with the key 'owner' and the value 'blogOwner', which can again be user1, user2, user3, etc., depending on the blog being requested. This is typically queried out of the service’s database.
These are the principal and resource that go to the Cerbos PDP, which then decides further action based on the predefined policy.
In our case if the ‘id’ == ‘owner’ or we can say userName == blogOwner, a new derived role of ‘owner’ is picked up by the requested principal.
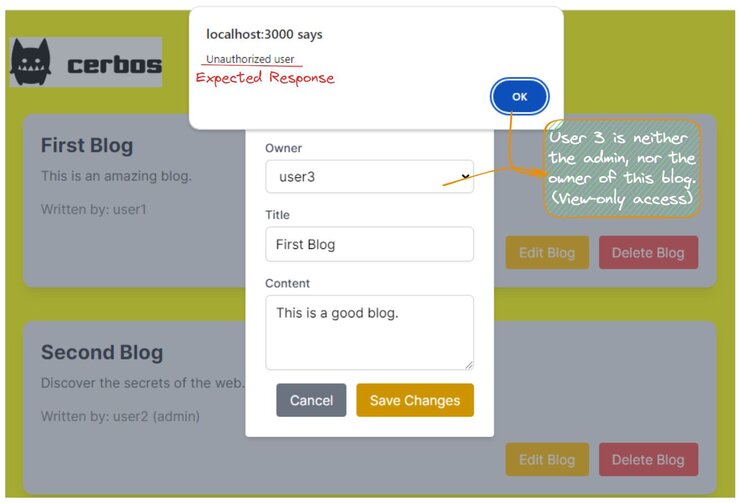
To test the efficiency and functionality of our access restriction features, we will go back to the frontend and attempt to alter a blog document or post without owning it or having administrative access. Our system should detect this unauthorized attempt and block access accordingly.
When user3 attempts to edit blog1, written by user1, the request should be denied, and an alert stating "unauthorized user" should be displayed.
Now let’s try to delete a blog post as the owner or administrator to evaluate the performance of our access control system from a different angle. In this case, our system identifies the user's permitted status and provides access to the desired modifications.
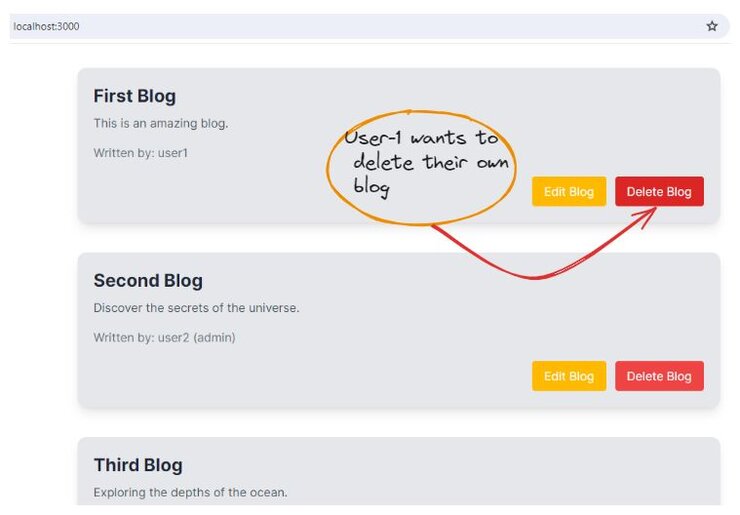
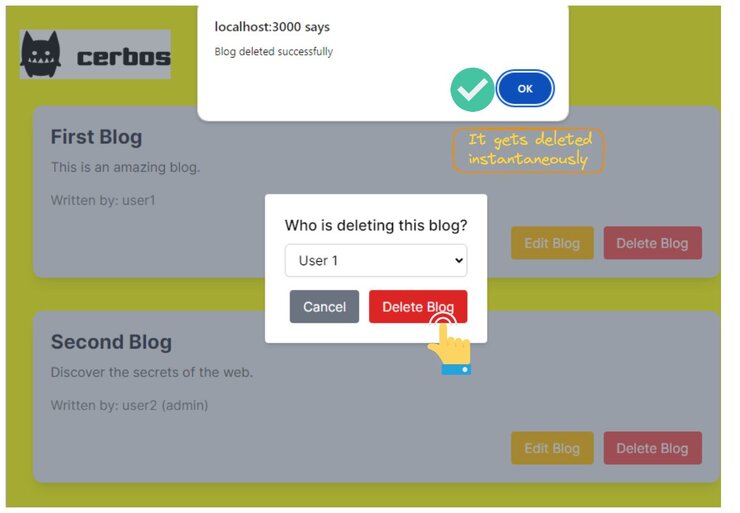
The above demonstration shows that the blog owner can delete it. Let us take a deep-dive into what actually is happening under the hood:
- A user (the principal) attempts to delete a blog post (the action on a resource).
- The Cerbos PDP receives the request and evaluates it based on the defined policy.
- The PDP checks if the blogPost resource's owner attribute matches the currentUser's id.
- If the condition is true, a derived role of “owner” is given to the user, and based on the role, action is either allowed or denied. The test successfully proved the viability of Cerbos' access control, enabling safe and efficient content and identity management for authorized users and consumers.
Conclusion
In a nutshell:
Step 1: Create Policies -> Deploy to Cerbos PDP
Step 2: User Action Request -> Query Cerbos PDP with [User, Action, Resource]
Step 3: Cerbos PDP Evaluates -> Returns [Allow or Deny]
Step 4: Result -> Agile, Context-Aware Authorization
You have integrated Cerbos authorization and seen the advantages of access control using a sample Spring boot blogging application. With your newfound ability to create intricate policy logic and YAML policy files, you can ensure that only the right person has access and security. Cerbos and Spring Boot integrate quite seamlessly and nearly effortlessly. With Cerbos Hub, you can fully maximize the potential of secure and scalable authorization. Sign up now to simplify access control and safeguard your applications.
Join the Community
Got questions? Stuck somewhere? Join the vibrant Cerbos community on Slack and get the help you need. Don't hesitate to reach out; a world of expertise is just a message away!
Book a free Policy Workshop to discuss your requirements and get your first policy written by the Cerbos team
Related Articles
Subscribe to our newsletter
Join thousands of developers | Features and updates | 1x per month | No spam, just goodies.